Noise is a problem that plagues many photographic lenses. This problem can impact the quality of your images depending on what subject you are working with. There are many techniques that can reduce noise, increase contrast, or sharpen images. Software can also help you adjust the sharpness and contrast of your photos. But, be careful.
Image noise
Image noise is the phenomenon where imperfect pixels appear in an image. The appearance of this noise depends on several factors, including the amount of light, ISO settings, and camera sensor size. Two images taken in the same conditions will produce different levels of noise. However, noise from different sources can be reduced using post-processing software.
There are several methods to reduce the amount of noise in an image, but the most common technique involves reducing ISO. Using a low ISO setting when retouching an image will minimize the noise. Another option is to shoot in RAW format. You have more control and flexibility when post-processing.
Sensor size
The sensor size can have a direct effect on how noisy photography is perceived. A sensor that is larger than the image's pixels will produce less noise. You can also use higher ISO settings with larger sensors. This ensures that image noise is reduced, especially for small print sizes.
The size of the sensor on a digital camera can have an immediate impact on the quality and image quality. Higher resolution sensors have more pixels. They can capture more light during exposure and have a wider dynamic range. Clipping occurs during the exposure and smaller pixels will have a shorter dynamic range.
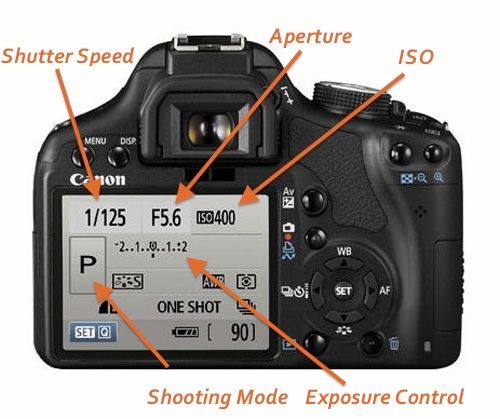
Shutter speed
Exposure is an important aspect of photography. These three exposure factors are shutter speed (or aperture), ISO sensitivity (or ISO sensitivity). All of these factors influence how bright a picture appears. Images that appear too bright are called over-exposed. Photographs with too little exposure, on the other hand, are considered under-exposed.
Your camera will expose a small piece of film to the light when you take photographs. The shutter is opened and closed. These two factors influence how fast the shutter opens or closes. This can impact the quality of your image. An understanding of shutter speed, noise, and how they affect your images can help you avoid common issues and increase your creativity.

Sensor temperature
Two aspects of photography can be problematic: sensor temperature and noise. Both noises can be caused by pushing the camera's limits. This can happen if you use burst mode or shoot in long exposures. These problems can often be avoided by making your camera less energy-intensive. But you can't completely avoid them.
Sensor noise is generated by the heat produced by the camera's electronics. The higher the sensor temperature, the more the noise it generates. This can be a problem especially when you take long exposure photos at high ISO settings. It is important to lower the temperature of your camera to achieve the best results.
FAQ
What is the rule for thirds in photography?
The rule of thirds can be used to create beautiful compositions, without having to use complicated camera settings. This divides your image horizontally and vertically into nine equal parts. It creates three main areas, where your subject should appear. These are the top and middle thirds (in the upper left corner), as well as the bottom and lower right. These areas can serve as guides to help you position your subject within your frame.
The rule to thirds allows you to avoid placing important elements too closely together or too far apart. They may not be able to create a strong visual impact if they are too close together. If you put them too far apart, they might lose focus because there isn't much room around them.
How do I look good in pictures?
You can look great in photos if you take them yourself. You'll learn how you pose for the camera and which angles are best. You'll also learn how to use lighting and props to enhance your natural beauty.
You will learn how to choose clothes that fit, make-up that suits you, and hairstyles and styles that work for your face.
If you are not happy with your results, we will show you how you can retouch them using Photoshop and other editing tools.
So, go ahead - take some self-portraits!
Which Lenses should I Use?
The most common question beginners ask is, "what lens should I buy?" It's a tough decision since there are so many options available.
There is good news: You don't need to buy new lenses every time you buy a new camera. You can instead add lenses later.
For starters, here are three types of lenses you might want to consider.
-
Wide Angle Lens: 14mm - 24mm: These lenses provide a wide angle of vision, which allows you to capture more details of your subject. You can zoom in to improve image quality.
-
Normal/Standard Zoom Lens (28mm - 70mm): These lenses allow you to change focal lengths while maintaining image quality.
-
Telephoto Zoom Lens (70mm-200mm): These lenses can be used to capture distant subjects. These lenses let you focus on the subject even if they are small.
These lenses can also be combined to produce different effects. One example is to use a regular lens to photograph close-up details and then switch to a long-range lens to capture faraway objects.
Statistics
- This article received 13 testimonials, and 100% of readers who voted found it helpful, earning it our reader-approved status. (wikihow.com)
- In this case, 100% of readers who voted found the article helpful, earning it our reader-approved status. (wikihow.com)
- While I cannot prove that all of those spots were not sensor dust, the photo was taken during a heavy snowstorm…so I guess that 99.8% of the spots are snowflakes. (bhphotovideo.com)
- By March 2014, about 3 million were purchased monthly, about 30 percent of the peak sales total. (en.wikipedia.org)
External Links
How To
How to capture pictures under low lighting conditions
Low-light photography is the art of taking photographs in dark or dimly lit environments. It requires special equipment. The main challenges are controlling exposure, white-balance, and sharpness. Low light photography can be divided into two categories: ambient and flash. Flash photography works well when you have enough light. A flash is required if there isn’t enough light. If your subject is outdoors but indoors, you might not have enough light to take a great picture without a flash. Try shooting at night, during the moonlit hours, if you don't need a flash. You'll be able to capture beautiful colors and shadows this way. Another option is shooting at twilight. Twilight is when the sun sets but there's still daylight.
You may also want to experiment with long exposures. Long exposures allow you to record images after the shutter has been open for several minutes. If the shutter is closed, the camera records only the light that falls onto the sensor. This light falls onto the sensor even after a long exposure. The shutter was not opened, so no new light entered the lens. You will see very little movement as a result. To ensure you're getting a clear image, turn off any automatic settings like autofocus and auto exposure. Also, make sure that you adjust the ISO setting before you start shooting. An ISO setting of 200 gives you more flexibility to control how bright or dark your image looks. Finally, when you're ready to take the shot, press the shutter button quickly. This will make the shutter close completely. Hold the shutter button down for the final second. You will prevent additional light from entering your camera by keeping the shutter button down. Once you have taken the image, wait for a few seconds before you release it. This will allow the camera to process your image. While waiting, you can check out your photos on your computer screen. When you are happy with your photos, save them to the computer.