There are many types of photography. These include Nature photography, night photography, still life photography, and product photography. These types are different from one another, but all of them can be very rewarding. For inspiration, try some of the following types of photos. These types of photography are described here. You can read the following to learn more about each type of professional photography. You can then choose the style that best suits you once you have learned about them.
Nature photography
Photography of nature requires patience. You must be ready to wait several hours or even days for the perfect shot. You must be able to identify random shapes, textures, and colors in the landscape. This is because you will be photographing a lot of living things. You can avoid disturbing these creatures by using RAW mode. This requires more light.
Night photography
The biggest challenge with night photography is the light. This is why you need to use a remote shutter and/or set a timingr to capture the moment. Streetlights can also add interest to a night photo. The effect of streaks from light coming from cars can be achieved by long exposures. If you have a studio equipped with high-quality lighting, you can also use a longer shutter speed to capture water reflections.
Still life photography
The best still life lenses are not necessarily the most popular. A telephoto, for instance, will behave in a different way than a 50mm. Also, a Telephoto lens will cause more distortion than a prime or standard lens. A telephoto or wide-angle lens is not recommended as they can cause perspective problems. The use of a telephoto zoom lens to capture still life is quite different than using it for landscape or cityscape photography.
Photography of products
The simple studio shot is the most basic form of product photography. This shows the product placed in front a white background. This type of photo is the simplest and least expensive. You can either fill your canvas with Photoshop or buy a seamless backdrop from a stock image library online. When you're in the studio make sure that the lighting is right for your subject. The background you choose can make a big difference in how the photo turns out.
Portrait photography
There are several basic differences between street photography and portrait photography. Street photography is about choosing the background and subject before taking the picture. Portrait photographers have to take into account the subject's pose as well as the background. Portraits that capture the subject closest to the camera are more effective. A skilled portrait photographer will be able capture multiple options and find the right shot. Documentary portraits emphasize natural emotion. They are often more complicated and include props, such as flowers or even a hat.
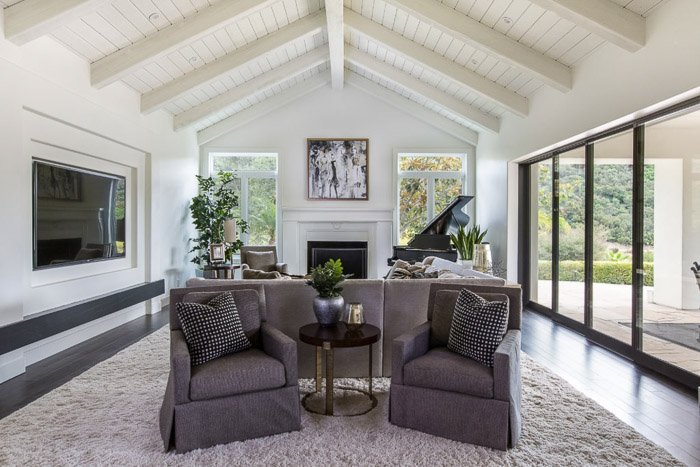
Real estate photography
Real estate photographers must be familiar with the lighting conditions and subject matter in order to adjust their camera settings to best suit the property. An example of this is a larger aperture setting that can be used to highlight specific architectural details, and a smaller one that can focus on the whole room. These techniques work well together and can be combined to add nuance and beauty. Real estate photographers should strive to be flexible, offer tips and advise on how to prepare a home for a photo shoot.
Food photography
You can make a living as a food photographer and food enthusiast. Food photography is a more difficult style than other types of photography. Food photography is used primarily for commercial purposes. To showcase food at its best, it requires capturing the ideal angle and lighting. Food photography requires a certain level of expertise and is very different from the usual Instagram photos.
Astrophotography
For the most amazing results, use a tripod for your astrophotography photography. Tripods prevent camera movement and minimize the chance of camera shake. A tripod allows you to take photos for as long as one minute with no camera movement. If you plan to shoot the night sky at a very early hour, use a tripod with an adjustable height. Make sure to take a few test shots to see which settings give you the best results.
FAQ
How can I learn how to photograph on my own.
There are many ways you can learn to take great pictures. You have many options. You could purchase a book or attend a class. Or you could join an online group. But if you want to master the art of taking pictures, there's nothing better than doing it yourself! You have full control over the final product. You'll only get better as long as your learning continues.
The best thing about digital photography? You don't need any expensive equipment. All you require is an internet-enabled computer and a good camera. The rest is up to you.
Here are some tips to get you started.
-
Get familiar with your camera's manual settings.
-
Learn the basics of how to use these controls.
-
Take many photos.
-
These should be edited.
-
Please share them.
-
Keep practicing.
-
Experiment.
-
Consider different angles and perspectives.
-
Use light sources creatively.
-
Practice makes perfect.
-
Don't be afraid to fail.
-
Be patient.
-
Have fun
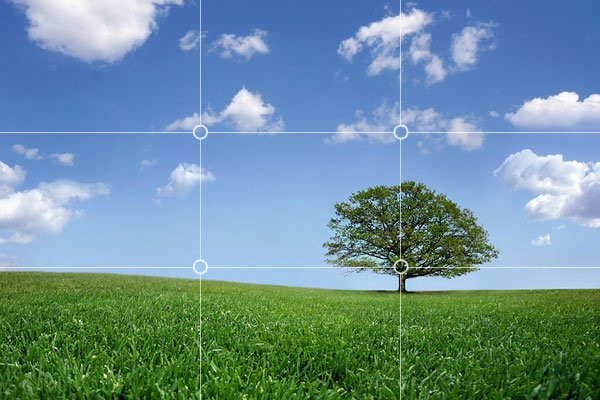
What is rule of thirds for photography?
The rule of thirds can be used to create beautiful compositions, without having to use complicated camera settings. It divides your image in nine equal parts, vertically and horizontally. This creates three main areas in which you want your subject. These are the top and middle thirds (in the upper left corner), as well as the bottom and lower right. These areas can be used as guidelines for positioning your subject within the frame.
The rule of thirds also helps you avoid placing important elements too close together or too far apart. If you place them near each other, they may not have enough space between them to make a strong visual impact. You might find that they lose focus if you place them too close together.
Should I start photography as a hobby?
Photography is a wonderful way for you to capture your memories and share them. It also allows you to learn more about the world around you.
You can find many online resources to help you learn how to take better photographs.
Consider taking classes at your local community college or art school. This will allow you to network with other photographers who can give valuable feedback on your work.
How do I become a good photographer?
Photography is an art form that requires practice, patience, dedication, and above all else, passion. If you are passionate about your photography, you will do much better than you would if you were only interested in making a living.
It is essential to understand how to use your camera effectively. You will need to know how to use your camera properly. Additionally, you should have a good grasp of Photoshop.
Photography is not easy, but once you master it, there is nothing quite as satisfying as creating images that capture moments in time that would otherwise have been lost forever.
If you want to improve your skills, then read books on the subject, attend classes and take part in competitions. This way, you will gain experience and confidence, leading to improvement. What equipment do I need?
It really depends on what kind of photography you like to do. If you're interested in landscape photography, for example, you'll need a wide-angle lens.
A telephoto lens is essential for portrait photography.
When taking photos, a tripod is essential. It allows you stand up and compose your photo without moving.
Camera bags can be useful for carrying your camera and memory cards as well as other accessories.
If you use a compact camera, a flash unit is required.
An DSLR (Digital Single Lens Reflex) is the best camera for beginners wanting to take professional quality photographs.
DSLRs are very popular because you can control every aspect of the photo including shutter speed, apertures, ISO sensitivity and white balance. A variety of features are available such as autofocus and auto-exposure locks, bracketing, self-timer, and RAW formatting.
Statistics
- By March 2014, about 3 million were purchased monthly, about 30 percent of the peak sales total. (en.wikipedia.org)
- Get 40% off Adobe Creative Cloud(opens in new tab) (creativebloq.com)
- While I cannot prove that all of those spots were not sensor dust, the photo was taken during a heavy snowstorm…so I guess that 99.8% of the spots are snowflakes. (bhphotovideo.com)
- This article received 13 testimonials, and 100% of readers who voted found it helpful, earning it our reader-approved status. (wikihow.com)
External Links
How To
How to photograph in low light conditions
Low-light photography refers to taking photos in dimly lit or dark environments. It requires special equipment. The main challenges include controlling exposure, white balance, and sharpness. Two types of low-light photography exist: ambient or flash. Flash photography works best when there's enough light around. But if there isn't enough natural light, then you'll have to use a flash. Without a flash, it is possible to get a poor picture if the subject is indoors and not outdoors. A flash is not necessary if you aren't interested in shooting at night with the moonlit hours. This will allow you to get nice shadows and colors. Another option to consider is shooting during twilight. Twilight happens when the sun has set but there is still daylight.
Long exposures are also an option. You can record images even after the shutter is closed for several minutes. When the shutter remains closed, the camera records only light that falls on the sensor. During a long exposure, this light continues to fall onto the photo sensor. However, because the shutter remained shut, no new light enters the lens. The result is that there is very little movement. Turn off autofocus and autoexposure to ensure you get clear images. You should also adjust the ISO setting prior to you start taking photos. An ISO setting of 200 allows you to adjust how bright or dark the image looks. The shutter button should be pressed quickly when you are ready to take the photo. This causes the shutter to close completely. Keep the shutter button pressed down until the last second. You will prevent additional light from entering your camera by keeping the shutter button down. After you've taken the picture, wait a few seconds before releasing the shutter button. This allows the camera's to process the image. While you wait, your photos will be displayed on your computer's screen. When you are happy with your photos, save them to the computer.