Cameras can choose between single or manual autofocus. These features can help you take great photos, but sometimes they can also cause you to make the wrong decision. This article explains the basics of camera settings. We'll also address auto whiteballed, shutter speed, aperture. Then we will discuss how these options can be used to create beautiful photographs.
Basic settings
It is crucial to choose the right settings for your camera in order to take great photos. The basic settings of the camera control exposure, depth-of-field, sharpness, noise, and overall sharpness. These settings can be altered to achieve the desired effect. You can learn how to use these settings to create a more artistic image. Basic camera settings are not difficult to learn and don't take much time to master.
You should always focus on the object that is in focus when taking photos. But the background will often be out-of-focus. A wider aperture allows more light into the camera and results in a shallow depth-of-field. In general, f4 and f5.6 are recommended for most photographers, as they will keep the subject in focus. While you might consider shooting at a higher F value, be aware of the possible risks.
Auto white balance
There are many preset white balance settings available for cameras, including Auto white Balance (AWB). Let's examine these options and see how they affect color reproduction. A cat taken under a cloudy sky appears more natural in AWB than a cat taken in daylight.
Although a neutral white-balance is acceptable for most situations, it will not always produce the best images. Particularly, carnivals are likely to be lit by many different sources so photos taken with a neutral balance will not capture the carnival atmosphere.
Shutter speed
The shutter speed of your camera controls the amount light that hits it during exposure time. It also controls how much motion is captured in the frame. For example, if the subject is moving during the time the shutter is open, the photo will be blurry. For best results, a tripod can be used.
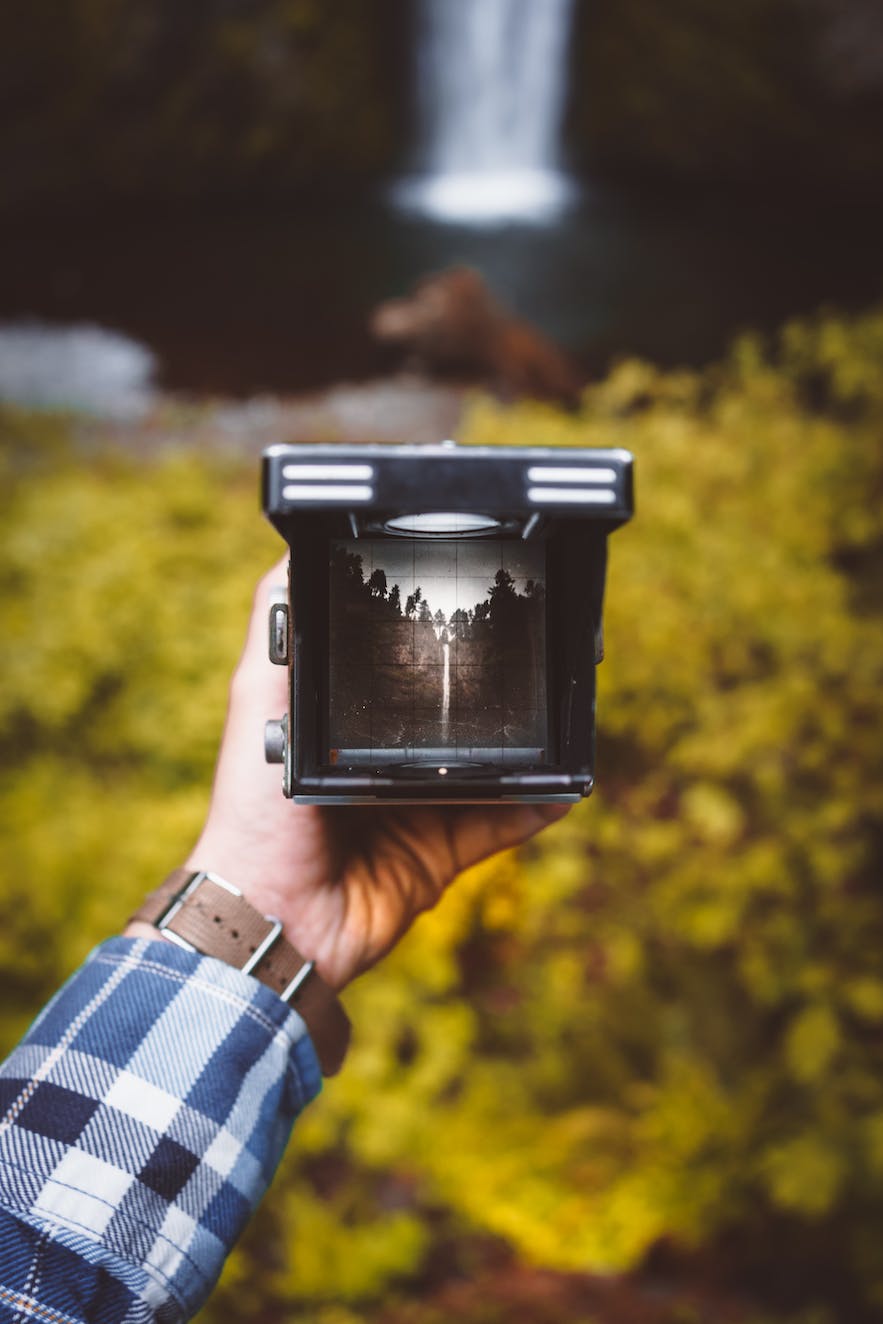
When photographing a waterfall, a slower shutter speed is best. You will capture the ripples and water movement without motion blurring. You should not use a shutter speed greater than 1/50 seconds if you want to capture the water moving. A faster shutter speed will blur water detail so it is important to use post-processing.
Aperture
Aperture is an important camera setting because it affects how much light is allowed to enter the sensor. The fstop can be adjusted to increase the brightness of the photo or decrease the light level. ISO (International Organization for Standardization) is another setting that controls how sensitive the camera to light. ISO (International Organization of Standardization) used to regulate the speed of film in the past. However, it is used today to control the camera’s sensitivity to light.
Because it determines how light enters the camera sensor, the aperture setting is crucial. To make your photos vivid, aim for an aperture of f/1.4-f/2.8. A larger aperture will put your subjects more in the background, while a smaller setting will make them look blurrier.
ISO
ISO is an indicator of the light sensitivity of your camera sensor. ISO indicates how sensitive your camera is to light. Higher ISOs mean that your camera can capture more light. Your camera can capture less light if your ISO is lower. Increasing the ISO can make your images appear more detailed and rich. It's also important to note that higher ISOs also allow you to shoot at faster shutter speeds.
The ISO setting is what controls the brightness of your photos. This concept is fundamental in photography. The best ISO settings will yield the best results. After learning how to modify ISO, you can choose the shutter speed you want and the aperture you prefer.
Focus
The focus settings of a camera are the most crucial element of a photo. These settings determine how sharp an image is. They isolate the subject and draw the viewer's attention to it. The depth of field, also an important aspect of focal point, is the area in which the subject is situated.
The camera's aperture controls the distance between the foreground (or background) and the center of focus. You can blurry images by changing the aperture setting. It can also affect the background of the subject.
Exposure compensation
Exposure compensation is an important feature of a camera that allows you to adjust the exposure of the image. Modern cameras can measure images with the most precise exposure. However, it is possible to make adjustments. The majority of cameras allow exposure compensation to be adjusted by at least 1/3 stop. Although it is not something you should rely upon, exposure compensation can be very useful when your camera makes poor decisions.
Exposure compensation allows you to adjust the camera's meter settings so that the final image is as dark or as light as you would like. Exposure compensation works in increments. This allows you to make quick changes and preserve the balance of your camera settings. Exposure compensation can be used both for artistic and practical reasons.
FAQ
What camera is the best for beginners, and why?
The best camera for beginners depends on your budget, needs, and skill level.
For instance, you could choose a point & shoot digital camera if your goal is to save some money. These cameras aren't as versatile as they look, but they provide good quality.
Digital Single Lens Reflex (DSLR) cameras can be equipped with interchangeable lenses that enable you to shoot different types. These are typically more expensive than point-and-shoots, but they provide much greater flexibility.
A beginner's package is a great way to get started in photography. Everything you need, including a flash, tripod, memory card and camera body, will be included in the one-pack.
Do not forget to get extra batteries!
What can I do to learn photography?
There are many different ways to learn how take great photos. There are several options. You can read a book, go to a class, or join an internet community. But if you want to master the art of taking pictures, there's nothing better than doing it yourself! That way, you have complete control over what goes into each photo. You'll only get better as long as your learning continues.
Digital photography doesn't require expensive equipment. All you need is a computer with internet access and a camera. The rest is up for you.
Here are some ways to get started.
-
Make sure you are familiar with your camera’s manual settings.
-
Learn how to use the controls.
-
Make sure to take lots of pictures.
-
You can edit them.
-
These should be shared.
-
Keep practicing.
-
Experiment.
-
Consider different angles and perspectives.
-
Use light sources creatively.
-
Practice makes perfect.
-
Be willing to fail.
-
Be patient.
-
Have fun
Do I Need A Tripod?
This is one of those common questions. Although a tripod might not always be needed, they can be useful.
A tripod allows you to stabilize your camera when taking photos at slow shutter speeds. Tripods can be a huge help when you are shooting landscapes or stationary subjects.
On the other hand, if you're photographing moving subjects such as sports or people, using a tripod can cause blurriness. How do you determine which situations need a tripod?
A tripod is useful when you need to photograph stationary or fast moving subjects. Examples include:
-
Sports
-
People
-
Landscapes
-
Close-ups
-
Macro shots
Do this test to see if you are unsure if you require a tripod. Hold your camera still and look through the viewfinder. You will need a tripod if you see blurred lines and movement.
If there isn't blurring you won't notice any benefit from adding a tripod.
These are just a few tips to help you decide whether or not to purchase a tripod.
-
Smooth legs are important for tripods. This prevents unwanted vibrations from shaking your camera.
-
You should choose a sturdy tripod. Some tripods made of plastic may not last very long. Consider a tripod made of metal.
-
You may want to consider buying a remote-control device. This allows you to control your camera remotely. This allows you to set the shutter to automatically fire when you press it.
-
You should look for a tripod with 360 degree rotation. It makes it easy to position your camera horizontally or vertically.
-
Tripods are expensive. Expect to spend between $100 and $200. You'll still get a lot for your money.
-
Accessories like memory cards and filters should not be forgotten.
-
Check your local stores before buying online. Many retailers offer free shipping.
-
Read reviews to determine what customers think about a particular product.
-
Ask family and friends who have similar products.
-
For customer feedback, visit message boards and forums.
-
You can search online for reviews from other users.
-
Amazon.com allows you to compare prices, and receive customer feedback.
-
View photo galleries to see the different uses of tripods by photographers.
What is the rule or thirds?
The rule to thirds is a great way to create interesting compositions. It divides your photo into nine equal parts horizontally as well vertically. This divides your image into three areas that you would like to see your subject. These are the top third (the upper left corner), middle third (center), and bottom third (lower right). These areas can serve as guides to help you position your subject within your frame.
The rule to thirds allows you to avoid placing important elements too closely together or too far apart. They may not be able to create a strong visual impact if they are too close together. They may lose focus if they're too far apart.
Which Lenses Should I Use?
Beginners often ask, "What lens should I purchase?" It's a tough decision since there are so many options available.
The good news is that you don't necessarily need to buy a new lens every time you purchase a new camera. You can simply add lenses later.
There are three types possible lenses.
-
Wide Angle Lens (14mm to 24mm): These lenses allow you to see more of your subject from a wider angle. You can also zoom in without losing image quality.
-
Standard/Normal Zoom Lens (28mm – 70mm): These lenses allow for you to adjust focal lengths and maintain image quality.
-
Telephoto Zoom Lens (70mm to 200mm): These lenses make it easy to capture distant subjects. They allow you to focus on your subject despite the fact that they may seem small in the frame.
These lenses can be combined in a variety of ways to create new effects. You can use a normal lens for close-up detail and switch to a zoom lens to capture distant objects.
How can I look great in photos?
The best way to ensure you look good in photos is to take them yourself. You will learn how to pose, which angles are flattering and which are not. Learn how to use lighting, props and other tools to enhance your natural beauty.
Learn how to select clothes that fit you well, what make-up looks good on you and what hairstyles best suit your style.
We'll also show you how to retouch images with Photoshop or other editing software if you aren't satisfied with the results.
Don't be afraid to take some self-portraits.
What makes a good camera backpack?
Choosing a camera bag is important because it protects your gear while traveling. These are the things to consider when shopping for a bag.
-
To comfortably carry your accessories and camera, choose a large bag. Don't get any bigger than you really need.
-
Durability: Choose bags made from durable materials like leather, canvas or nylon. Avoid plastic or fabric bags.
-
Protection: Make your bag waterproof against dirt, moisture and scratches
-
Organization: To make it easier to find what you need, organize your gear according to type. You could, for example, place your lenses in one area, your memory card in another and your battery charge in yet another.
-
Comfort: Avoid carrying around a bulky bag when you are shooting. Instead, carry a shoulder belt. Also, look for a comfortable design with padded straps.
-
Price: Look around for the best price. You may find some brands that sell their products at a discount price, which is a great bonus.
-
Warranty: Check to see if the company offers a limited warranty. This way, if anything happens to your bag, you know who to contact.
Statistics
- In this case, 100% of readers who voted found the article helpful, earning it our reader-approved status. (wikihow.com)
- The second easiest way to get blurry photos 100% of the time is to use a cheap filter on the front of your lens. (photographylife.com)
- While I cannot prove that all of those spots were not sensor dust, the photo was taken during a heavy snowstorm…so I guess that 99.8% of the spots are snowflakes. (bhphotovideo.com)
- This article received 13 testimonials, and 100% of readers who voted found it helpful, earning it our reader-approved status. (wikihow.com)
External Links
How To
How to take pictures in low lighting conditions
Low-light photography can be defined as taking photos in dimly lit and dark environments. It requires special equipment. The main challenges are controlling exposure, white-balance, and sharpness. There are two kinds of low light photography. Flash photography works best when there is enough lighting around. You will need a flash if you don't have enough natural light. If your subject is outdoors but indoors, you might not have enough light to take a great picture without a flash. Shooting at night in the moonlight hours is a good alternative to using a flash. This will give you some beautiful shadows and colors. Another option is taking photos at twilight. Twilight happens when the sun has set but there is still daylight.
Long exposures are also an option. Long exposures allow you to record images after the shutter has been open for several minutes. The camera records only light falling on the sensor if it is kept closed. This light continues to fall onto a photo sensor throughout a prolonged exposure. However, because the shutter remained shut, no new light enters the lens. This means that you will not see any movement. To ensure clear images, disable any autofocus and exposure settings. Adjust the ISO setting before you start to shoot. An ISO setting of 200 allows you to adjust how bright or dark the image looks. The shutter button should be pressed quickly when you are ready to take the photo. This will make the shutter close completely. Hold the shutter button down for the final second. You will prevent additional light from entering your camera by keeping the shutter button down. Wait a few seconds after you have taken the photo before you release the shutter button. This allows your camera to process the picture. While you wait, your photos will be displayed on your computer's screen. Once you're satisfied with them, save them to your computer.