
Introducing the Canon EOS Rebel SL3: a budget-friendly, well-built DSLR that is suitable for novice photographers and videographers alike. It packs a powerful 24.1 Megapixel CMOS (APS-C) sensor and DIGIC 8 processor, which provides a plethora of features that will enhance your photography and video recording experience. Amazon has this camera for $549. The intuitive menu system makes getting started easy.
The SL3 includes a flipout 3-inch variangle LCD monitor that is both clear and responsive. The LCD display is also equipped with touch-autofocus, making it ideal for selfies.
Canon's Dual Pixel CMOS AF tech is very useful for video recording. This technology allows you focus on subjects as you film. The LiveView screen lets you view AF points live, which can be very useful in learning how to use the camera. Eye Detection AF also comes with this technology. This is great for portraits.
The camera has a Time-Lapse Movie option that allows you take up to 3600 consecutive frames. The camera can also capture 4K video at a maximum bitrate limit of 120Mbps. Although the camera can record high-resolution video in 30p resolution, this format may be too slow for fast-moving subjects.
The SL3 also features an innovative pop-up flash that is manual and can be triggered by a finger. Canon's EX 470 EX AI speedlight can be used to fill in the camera when outdoors. The camera does not have an additional pop-up flash but
The Canon SL3's menu is one of the most user-friendly on the market. It is intended for beginners, who do not want to spend too long fiddling with settings. There are many useful functions available in the menu. One of them is Live View, which allows you see the results of exposure adjustments in real time. The camera features a unique AF system with 9 points that allows you to easily focus on subjects directly in front of or behind.
The SL3 features one SD card slot that is co-located in the battery compartment. This feature, found on many cameras, can help prevent the camera’s battery from draining completely. However, the SL3 manual does NOT provide information on how to choose which memory card. Although the SL3's menu system might be best for beginners it may not be as intuitive for experienced photographers.
Live View mode is available on the SL3 and includes a touchscreen. This allows users to see how best to use their camera. You will also find a number of useful features such as eye detection and auto-strobe adjustment. The SL3's Live View mode is also good for selfies, as it allows you to adjust the camera's focusing distance and exposure.
Live View mode of the SL3 features a neat-looking Live View screen. It allows you see real-time results of exposure changes and white balance adjustments. This function is especially helpful for newcomers to video recording.
FAQ
What equipment is necessary to begin digital photography
If you are just starting to get into digital photography, the most important thing is to choose which camera you would like. There are many options: DSLRs (digital Single Lens Reflex Cameras), point-and–shoot compact cameras or camcorders. Each model has its own unique features and advantages. DSLR cameras, for example, offer superior quality images but are heavier and larger than other types. Point-and-shoot cameras are smaller and lighter and often include automatic settings for certain situations. Camcorders offer excellent video recording capabilities, and may also have still photo shooting modes. Smartphones can be small and lightweight and are easy to transport.
After you have decided which type of camera you want to purchase, you need to decide if you prefer to buy a new or used model. You can find affordable used cameras, particularly if you bought them in the last few years. Because manufacturers invest large sums of money in developing new technology, new models tend to be more expensive.
Next, you will need lenses. Your photographs' quality will depend on the lenses you choose. These lenses allow you control the focal length of your lens, which allows you to zoom into the scene and not lose focus. Some lenses have built-in flash units, while others require external flash units. There is a wide selection of lenses available from different brands. Each lens has its own characteristics.
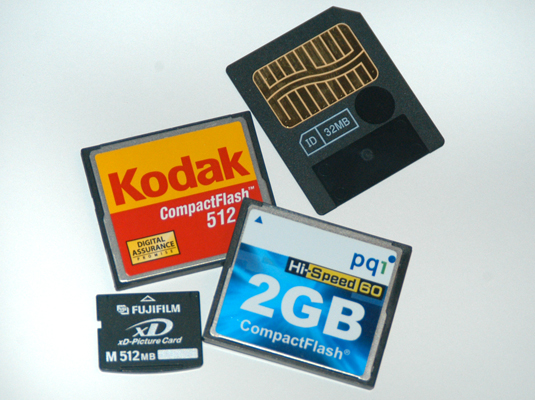
Finally, you'll need to buy memory cards. Memory cards are used to store images taken with your camera. The size of your memory card will depend on the number of images it holds. It could store hundreds of thousands or even millions of pictures. Multiple memory cards are required if you intend to take many pictures.
Why use Light Room to enhance your pictures?
To ensure that you get the best photos for your project, it is best to start early. It is always better to take as many photos as you can and then choose the best.
Lightroom makes it easy to do this. It lets you see how different settings impact each photo. You can adjust these settings instantly without returning to Photoshop. This allows you to quickly experiment with what looks good and what doesn’t.
Do I Need A Tripod?
This is one of those questions that everyone asks. Although a tripod might not always be needed, they can be useful.
A tripod allows you to stabilize your camera when taking photos at slow shutter speeds. A tripod is a great option for landscapes and other stationary subjects.
However, a tripod can blurriness if you are photographing moving subjects, such as people or athletes. How do you decide which situations are best served by a tripod.
A tripod is useful in situations where you want to take pictures of fast action and stationary subjects. Examples include:
-
Sports
-
People
-
Landscapes
-
Close-ups
-
Macro shots
Try this test to find out if you really need a tripod. You can hold your camera still while you look through the lens. A tripod is necessary if you notice blurred lines or movement.
If you don't see any blurring, you probably won't notice any improvement by adding a tripod.
These tips will help you make the right decision about whether to invest in a tripod.
-
Smooth legs are important for tripods. This helps prevent vibrations that could shake your camera.
-
A tripod is a good choice. Some tripods made of plastic may not last very long. Instead, choose a metal tripod.
-
You might consider purchasing a remote control. Remote control allows you to remotely control your camera. You can set it to fire the shutter once you press the button automatically.
-
You should look for a tripod with 360 degree rotation. It makes it easy to position your camera horizontally or vertically.
-
Keep in mind that tripods aren't cheap. Expect to spend around $100-200. But, you will get a lot for your buck.
-
Accessories like memory cards and filters should not be forgotten.
-
Check your local stores before buying online. Many retailers offer free shipping.
-
You can read customer reviews to see what people think of a product.
-
Ask friends and family members who own similar products.
-
Visit forums and message boards to learn about customer experiences.
-
User reviews can be found online.
-
Amazon.com offers the ability to search for prices and view customer feedback.
-
Browse photo galleries to get an idea of what photographers do with their tripods.
Which Lenses Should I Use?
The most frequently asked question by beginners is "What lens should i buy?" Because there are so many options, it can be difficult to choose.
The good news is that you don't necessarily need to buy a new lens every time you purchase a new camera. You can simply add lenses later.
There are three types possible lenses.
-
Wide Angle Lens (14mm-24mm): These lenses have a wide view angle that will allow you to capture more of your subject. You can zoom in, but not lose image quality.
-
Normal/Standard Zoom Lens (28mm to 70mm) : These lenses allow you the flexibility of changing focal lengths, while still maintaining high quality images.
-
Telephoto Zoom Lens (70mm–200mm) : These lenses are ideal for photographing distant subjects. These lenses let you focus on the subject even if they are small.
These lenses can be combined to create different effects. Combining lenses can create different effects. For example, a normal lens could be used to capture small details while a telephoto lens is used to capture faraway objects.
Photography is a great job.
Photography is an artistic form that allows one to capture and share moments in time. If you're willing to work hard, it can also be a great way of making money. There are many paths to professional photography. As a hobby, you can take photos of friends and relatives. This would improve your confidence and skills. Once you are comfortable with this stage, you will be able to move on to paid assignments. The best photographers can make a living as a photographer. They may take clients to events such as weddings and parties, where they must capture images of people enjoying themselves. But most professionals prefer commercial work such as advertisements or product shots.
To be a successful photographer, you must first identify what kind of photography interests you. Then practice, experiment, and try new techniques until you get comfortable with the process. Experimentation is your best tool, so don't expect overnight success.
When you are just starting out with photography, it is important to first master technical skills. Then, focus on creativity. Photography has both artistic and technical elements. You will be able to succeed quicker if you learn how to use the right tools, and the basics of composition.
You need to decide if you want a career in photography. Some people choose to combine their passion for photography with other jobs. For example, you might work at a local newspaper or magazine while pursuing freelance assignments. Others decide to dedicate all their free time to photography. It doesn't matter what way you go, success in any creative field requires dedication and commitment.
It is important to take the time and effort necessary to make a career out of photography. It is important to think carefully about what you really want to do with your life.
How can I improve the quality of my photos on my phone
You don't need expensive equipment to take great photos! Amazing images can be captured with a smartphone.
It is easy to learn how to use its various features and some basic techniques.
Many apps are available for iOS and Android that allow you to easily edit and share photos.
Here are five tips for taking better pictures.
-
Set Up Your Camera App. Your device should already have your camera app installed. If not, download it from Google Play or Apple's App Store.
-
Use effects and filters. Filters and effects allow you to change the appearance of your photo without having to touch your image.
-
Adjust the exposure. Adjusting the exposure can help you control the brightness in your picture.
-
Photograph in the Right Light Bright light allows you to better see the details of your subject. You can capture highlights and shadows in low-light conditions.
-
Take Pictures Of People. Taking pictures of people shows others the things you love most.
Learn more about taking better photos with your smartphone by reading our article 5 Tips to Improve Your Photography Skills.
Statistics
- While I cannot prove that all of those spots were not sensor dust, the photo was taken during a heavy snowstorm…so I guess that 99.8% of the spots are snowflakes. (bhphotovideo.com)
- This article received 13 testimonials, and 100% of readers who voted found it helpful, earning it our reader-approved status. (wikihow.com)
- The second easiest way to get blurry photos 100% of the time is to use a cheap filter on the front of your lens. (photographylife.com)
- In this case, 100% of readers who voted found the article helpful, earning it our reader-approved status. (wikihow.com)
External Links
How To
How to take pictures in low lighting conditions
Low-light Photography is when you take photos in dimly lit or dark environments. It requires special equipment. The main challenges are controlling exposure, white-balance, and sharpness. Two types of low-light photography exist: ambient or flash. Flash photography works best when there is enough lighting around. A flash is required if there isn’t enough light. A flash might be necessary if you are photographing a subject indoors and outside. You can also shoot at night when the moon is shining. You'll be able to capture beautiful colors and shadows this way. Another option is shooting at twilight. Twilight is the time when the sun has set and there's still daylight.
Also, you might want to try long exposures. Long exposures can be used to capture images even if the shutter has been closed for several minutes. The camera records only light that falls on it if the shutter is not closed. This light will continue to fall onto your sensor after a long exposure. The shutter is still closed so no light can enter the lens. Therefore, there is very little movement. Turn off autofocus and autoexposure to ensure you get clear images. Make sure to adjust the ISO setting before starting to shoot. An ISO setting of 200 allows you to adjust how bright or dark the image looks. Next, click quickly on the shutter button to capture the shot. This causes the shutter to close completely. Hold the shutter button down for the final second. To prevent additional light entering the camera, hold the shutter button down. Once you have taken your picture, wait for a few moments before you release that shutter button. This will allow the camera to process your image. While waiting, you can check out your photos on your computer screen. Once you're satisfied with them, save them to your computer.